Master Mobile App Automation Execution Testing Across Multiple Devices

Master Mobile App Automation Execution Testing Across Multiple Devices

29 May 2024 11 Minutes Read BY Anjana Prakash

What is Appium Automation?

Appium is an open-source tool. With the help of this utility, mobile apps for iOS, Android, and Windows shall be automated. The users shall use standard programming languages like Python, Java, JavaScript, C#, Ruby, etc. to construct automation tests. They shall also use Appium to automate human-like behaviors within mobile apps, such as inputting text, touching buttons, swiping, and answer validation.


Key Features of Appium Automation:

  1. Cross-Platform Compatibility:
    • Appium may support the automation of native, hybrid, and mobile web applications across various platforms, like iOS, Android, and Windows.
  2. Standard WebDriver Protocol:
    • Appium may use the WebDriver protocol to interact with mobile devices and emulators, making it compatible with Selenium WebDriver APIs.
  3. Support for Multiple Programming Languages:
    • Appium tests shall be written using popular programming languages such as Java, JavaScript, Python, Ruby, C#, and more, allowing flexibility based on your team’s expertise.
  4. No Need for App Code Modifications:
    • Appium automates mobile apps without requiring any modifications to the app’s source code, enabling seamless integration with existing applications.
  5. Real Device and Emulator/Simulator Support:
    • Appium can automate tests on real devices as well as emulators/simulators, providing flexibility in testing environments.
  6. Comprehensive Element Identification:
    • Appium shall permit the locating of elements within mobile apps using various locator strategies (e.g., ID, XPath, accessibility IDid), similar to how Selenium WebDriver works for web applications.
  7. Integration with Continuous Integration (CI) Tools:
    • Appium shall be integrated with CI tools like Jenkins, Bamboo, and others, enabling automated test execution as part of the development pipeline.


Appium Automation Workflow:


Appium Automation Workflow - Testvox


  1. Installation and Setup
    • Install Appium using Node.js and npm with the command: npm install -g appium
    • Download and install the Appium Desktop Client for a GUI to configure the Appium server and manage test execution.
    • Configure physical devices or emulators. Enable USB debugging for Android or install WebDriverAgent for iOS.
  2. Writing Test Scripts
    • Understand a programming language like Java, Python, or JavaScript to write effective test scripts.
    • Add the Appium client library to your project to facilitate automation.
    • Use Appium Inspector to identify UI elements, view properties, and generate code snippets.
  3. Execution and Testing
    • Execute automated tests with Appium on iOS, Android, and Windows platforms through your IDE or command line.
    • Leverage Appium’s support for parallel execution to enhance efficiency and scalability.
    • Review test results provided by the Appium server via HTTP responses to understand and troubleshoot issues.
  4. Cross-Platform Testing
    • Write tests that work across iOS, Android, and Windows using the same API.
    • Reuse test scripts across different platforms with minimal changes due to Appium’s consistent API.
  5. Continuous Improvement
    • Perform iterative testing cycles to refine scripts and improve the automation process.
    • Engage with the testing community and utilize resources like documentation and forums for ongoing learning and improvement.


Example for Automation Code and Execution:

Automation code using Java and Appium

Adopting the Page Object Model (POM) design pattern may significantly improve the readability, reusability, and maintainability of your test automation framework when utilizing Appium with Java for mobile automation. By keeping test automation logic and online or mobile page representation separate, the Page Object Model encourages an organized approach to writing test code.

What is the Page Object Model (POM)?

The Page Object Model is a design pattern used in test automation to encapsulate the functionalities and elements of a web or mobile page into separate classes called “Page Objects.” Each Page Object represents a specific page or component of the application under test.


Components of Page Object Model:

  • Page Classes: Each web/mobile page is represented by a separate Page Class. This class contains the definitions of page elements (locators) and methods to interact with these elements.
  • Page Elements (Locators): Page Objects encapsulate the locators (e.g., XPath, ID, CSS selectors) used to identify and interact with the elements on the page (e.g., buttons, text fields, dropdowns).
  • Page Methods: Page Objects expose methods that represent actions or operations that can be performed on the page elements (e.g., clickButton(), enterText(), selectDropdownOption()).


Example of Page Object in Appium:

Locators:

public class SignInPage extends BasePage {

  private final HashMap<String, By> LblErrorInvalidLogin = new HashMap<String, By>() {{

   put("Android", AppiumBy.xpath("//android.view.View[@content-desc=\"We didn't recognize this email or password.\"]"));

   put("iOS", AppiumBy.xpath(""));

}};

   private final HashMap<String, By> txtPassword = new HashMap<String, By>() {{

       put("Android", AppiumBy.xpath("/hierarchy/android.widget.FrameLayout/android.widget.LinearLayout/android.widget.FrameLayout/android.widget.FrameLayout/android.widget.FrameLayout/android.view.View/android.view.View/android.view.View/android.view.View/android.widget.ScrollView/android.view.View[3]"));

       put("iOS", AppiumBy.xpath(""));

   }};

   private final HashMap<String, By> btnContinue = new HashMap<String, By>() {{

       put("Android", AppiumBy.xpath("//android.widget.Button[@content-desc=\"Continue\"]"));

       put("iOS", AppiumBy.xpath(""));

   }};

   private final HashMap<String, By> lblLogged = new HashMap<String, By>() {{

       put("Android", AppiumBy.xpath("//android.view.View[@content-desc=\"Welcome to the team, Rayan!\"]"));

       put("iOS", AppiumBy.xpath(""));

   }};


Methods in page objects:

public SignInPage(AppiumDriver driver) {

       super(driver);

   }

   public SignInPage enterEmail(String email) {

       Actions.clickElement(txtEmail, 30, 10000);

       Actions.sendText(txtEmail, email, 30, 10000);

       return this;

   }

   public SignInPage enterPassword() {

       Actions.clickElement(txtPassword, 30, 10000);

       return this;

   }

//android.widget.Button[@content-desc="Continue"]

  public SignInPage clickContinue() {

       Actions.scrollElement("Continue");

   Actions.clickElement(btnContinue, 30, 10000);

   return this;

   }

   public boolean welcomeNoteDisplay() {

       boolean isWelcomeDisplayed=Actions.isDisplayedCheck(lblLogged, 30, 10000);

       return isWelcomeDisplayed;

   }


Test Class:

public class LoginTest extends TestNGListener {

   LaunchPage launchPage;

   FilterPage filter;

   SignInPage login;

   ProcessPage chargeProcess;

   AccountPage account;

   HomePage home;

   AccountSettingsPage settings;

   @Test(dataProvider = "platforms", testName = "Login Functionality-Valid", description = "care crown login validation with valid credentials")

   public void loginIntoApplicationValidCase(String platform) throws InterruptedException {

       launchPage = PageFactory.getInstance(LaunchPage.class);

       login = PageFactory.getInstance(SignInPage.class);

 filter = PageFactory.getInstance(FilterPage.class);

       chargeProcess = PageFactory.getInstance(ProcessPage.class);

       account = PageFactory.getInstance(AccountPage.class);

       home = PageFactory.getInstance(HomePage.class);

       LaunchPage launchPage = PageFactory.getInstance(LaunchPage.class);

       launchPage.clickGetStarted().clickLogin();

       login.enterEmail(Constants.EMAIL).enterPassword();

       Actions.keyStoreEventOnAndroidPassword();

       login.clickContinue();

       if (login.welcomeNoteDisplay()) {

           login.loggedInValidation();

       } else {

           home.clickhamburgerIcon().NameInHamburger();

       }

   }

   @Test(dataProvider = "platforms", testName = "Login Functionality-Invalid", description = "care crown login validation with invalid credentials")

   public void loginIntoApplicationInvalidCase(String platform) throws InterruptedException {

       launchPage = PageFactory.getInstance(LaunchPage.class);

       login = PageFactory.getInstance(SignInPage.class);

       home = PageFactory.getInstance(HomePage.class);

       LaunchPage launchPage = PageFactory.getInstance(LaunchPage.class);

       launchPage.clickGetStarted().clickLogin();

       login.enterEmail(Constants.INVALID_EMAIL).enterPassword();

       Actions.keyStoreEventOnAndroidPassword();

       login.clickContinue();

       login.invalidLoginValidation();

   }

}


The LoginTest class exemplifies the implementation of automated tests for login functionality in a mobile application using the Page Object Model (POM) design pattern. By organizing test logic into separate methods and leveraging Page Objects, the test suite becomes more maintainable and scalable.


Key Components and Responsibilities

  • Page Object Initialization: The class initializes various Page Objects using PageFactory.getInstance() method to interact with different screens and elements of the application under test.

launchPage = PageFactory.getInstance(LaunchPage.class);

login = PageFactory.getInstance(SignInPage.class);

home = PageFactory.getInstance(HomePage.class);

  • Test Methods: The class contains multiple test methods (loginIntoApplicationValidCase and loginIntoApplicationInvalidCase) annotated with @Test, each representing a specific test scenario with different input data (valid credentials and invalid credentials).


Understanding BrowserStack XML Configuration for Test Execution

<suite thread-count="1" verbose="1" name="Demo Android TestSuite" annotations="JDK" parallel="tests">

   <parameter name="endpoint" value="https://Username:[email protected]/wd/hub"/>

   <parameter name="host" value="BrowserStack" />

   <!--    Structure for execution platform is  <platform>:<deviceName(or)UUID>:<version> comma seperated multiples  -->

   <parameter name="executionPlatforms" value="Android:Samsung Galaxy S22 Ultra:12.0"/>

   <parameter name="androidApp"I'm value=""/>

   <parameter name="iosApp" value=""/>

   <parameter name="browserStackAndroidApp" value="bs://XXXXXXXXXXXXXXXXXXXXXXXXXXXXXX" />

   <parameter name="BrowserStackiOSApp" value="" />

   <parameter name="projectName" value="Regression execution" />

   <parameter name="build" value="1.0" />

   <parameter name="timezone" value="New_York" />

   <parameter name="geolocation" value="US" />

   <parameter name="browserstackUser" value="Username" />

   <parameter name="browserstackKey" value="Password" />

   <test thread-count="1" name="login" parallel="methods">

       <classes>

       <class name="tests.LoginTest"/>

       </classes>

   </test>

</suite>


The XML configuration file (testng.xml) plays a pivotal role in defining the test suite structure and configuring the test execution environment on BrowserStack. By utilizing this configuration, you can seamlessly integrate Appium tests with BrowserStack for automated testing on real devices in the cloud.

An XML configuration file is used to execute Appium tests on BrowserStack. This configuration file defines various parameters and settings required for running automated tests on real devices in the BrowserStack cloud.


1. Overview of XML Structure

The XML configuration file (testng.xml) is used with TestNG to orchestrate test execution and specify BrowserStack-specific parameters.

2. Parameters

  • endpoint: It is the BrowserStack WebDriver endpoint URL used for initiating sessions on BrowserStack’s Selenium Grid.
  • executionPlatforms: It defines the platform(s) on which tests will be executed, specified in the format <platform>:<deviceName>:<version>. Here, the example specifies an Android device (Samsung Galaxy S22 Ultra) with Android version 12.0.
  • browserstackAndroidApp: It represents the URL of the Android application package (apk) hosted on BrowserStack’s App Automate service for testing.
  • projectName and build: It is the name and version of the project being tested, used for organization and reporting purposes.
  • timezone and geolocation: It includes the timezone and geolocation settings for the test execution environment.
  • browserstackUser and browserstackKey: BrowserStack credentials (username and access key) are required for authentication.

3. Test Definition

  • <test> Tag: It specifies the test configuration, including the name and parallel execution settings (parallel=”methods”).
  • <classes> Tag: It defines the test classes or packages to be executed within the test.
  • <class> Tag: It specifies the test class (tests.LoginTest) to be executed in parallel.

4. Execution Flow

  • The testng.xml file orchestrates the test execution on BrowserStack by specifying the desired capabilities (executionPlatforms, browserstackAndroidApp) and test configurations (test and class).
  • TestNG leverages parallel execution (parallel=”methods”) to optimize the test suite’s performance by running test methods concurrently.


BrowserStack flow

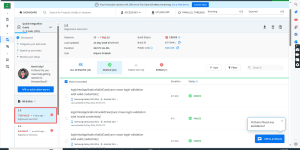
BrowserStack facilitates the execution of Appium tests on real mobile devices in the cloud. After running tests on BrowserStack, detailed execution reports and insights are provided to assist in analyzing test results effectively.


1. Introduction to BrowserStack App Automate

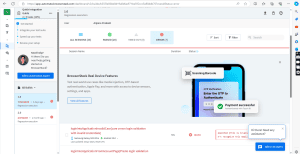
BrowserStack App Automate is a cloud-based testing platform that enables automated testing of mobile applications using Appium and Selenium WebDriver. It allows you to execute tests on a wide range of real iOS and Android devices, ensuring comprehensive test coverage across different device configurations.

2. Execution on App Automate

When you execute Appium tests on BrowserStack’s App Automate, the following details and insights are displayed post-execution:

  • Test Execution Logs: It includes detailed logs capturing each step of the test execution, including device interaction, commands sent to the device, and responses received.
  • Screenshots and Videos: BrowserStack captures screenshots and videos of the test execution, providing visual documentation of the test flow and any potential issues encountered.
  • Performance Metrics: Metrics such as CPU usage, memory consumption, network activity, and battery consumption are recorded during test execution, helping to identify performance bottlenecks.
  • Console Logs: Logs generated by the mobile application during the test run are collected, allowing for troubleshooting of application-specific issues.

3. Detailed Test Reports

After the test execution completes on BrowserStack App Automate, you can access comprehensive test reports containing:

  • Summary Overview: It includes a high-level summary of the test execution, including pass/fail status, total test cases executed, and duration.
  • Detailed Test Results: Individual test case results with detailed information on steps executed, assertions made, and any errors encountered are included.
  • Screenshots and Videos: Embedded screenshots and videos within the test report aid in visual verification of test outcomes.
  • Logs and Metrics: It has access to detailed logs, performance metrics, and device information for deeper analysis.

4. Integration with CI/CD

BrowserStack App Automate seamlessly integrates with Continuous Integration (CI) platforms like Jenkins, CircleCI, and Azure DevOps, allowing for automated test execution as part of your CI/CD pipeline. This ensures consistent and efficient testing across your development lifecycle.


Integration with CI/CD - Testvox


Integration with CI/CD - Testvox


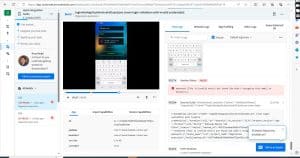
When a test fails in BrowserStack:

BrowserStack’s App Automate service offers comprehensive insights and detailed reports for failed test cases, empowering teams to diagnose, debug, and resolve issues efficiently during mobile app testing. By leveraging the provided information, you can streamline your debugging process and ensure the quality of your mobile applications.

When a test case fails during execution on BrowserStack’s App Automate, detailed information and insights are provided to assist in identifying the root cause of the failure. Here’s a breakdown of the details you can expect to see for failed test cases in BrowserStack:


Details of Failed Test Cases in BrowserStack App Automate

1. Test Case Overview

  • Test Case Name: It is the name of the failed test case, as specified in your test scripts or TestNG XML configuration.
  • Failure Status: It is an indication that the test case has failed, along with any relevant error messages or stack traces.

2. Error Screenshots and Videos

  • Screenshots: BrowserStack captures screenshots at the point of failure, providing visual context of the app’s state when the failure occurred. These screenshots are invaluable for understanding the UI state and potential issues.
  • Video Recording: Along with screenshots, BrowserStack records a video of the test execution, allowing you to replay the sequence of actions leading up to the failure. This aids in reproducing and diagnosing the issue.

3. Logs and Console Output

  • Console Logs: BrowserStack collects console logs generated by the mobile application during the test execution. This includes any errors, warnings, or debug messages logged by the app, which can provide crucial insights into the underlying cause of the failure.
  • Appium Server Logs: BrowserStack also captures logs from the Appium server, including commands sent to the device and responses received. Examining these logs can help pinpoint issues related to device interaction or test script execution.

4. Performance Metrics (if applicable)

  • Device Metrics: BrowserStack App Automate may provide performance metrics such as CPU usage, memory consumption, network activity, and battery usage during the test execution. Anomalies or spikes in these metrics can indicate performance-related issues causing test failures.

5. Error Details and Stack Traces

  • Error Messages: Detailed error messages associated with the failure can provide insights into what went wrong during the test execution.
  • Stack Traces: If the failure is due to an exception or assertion failure in your test code, BrowserStack displays the stack trace, highlighting the specific line of code where the error occurred. This aids in debugging and fixing the issue.

6. Integration with Bug Tracking Tools

  • Bug Reports: BrowserStack allows you to integrate with bug-tracking tracking tools like JIRA, GitHub Issues, or Slack. Failed test cases can be automatically logged as bugs, along with all relevant details (screenshots, logs, and videos) attached to the bug report for efficient issue resolution.

7. Reproducibility and Debugging

  • Reproducibility: With detailed information provided by BrowserStack, you can attempt to reproduce the failure locally using the same test environment configuration. This helps in verifying the issue and implementing a fix.

8. Collaboration and Sharing

  • Sharing Reports: Test reports and failure details can be easily shared with team members or stakeholders, facilitating collaboration and communication for issue resolution.


CI/CD Failed case - Testvox


CI/CD Failed Case - Testvox


Multi-Device Automation Testing Execution in BrowserStack

Executing multi-device automation testing using BrowserStack involves leveraging BrowserStack’s capabilities to run automated tests across various devices, browsers, and operating systems simultaneously. BrowserStack provides a cloud-based platform that allows you to perform cross-browser testing efficiently. Here’s a general guide on how to set up and execute multi-device automation testing using BrowserStack:

Parallel Testing: BrowserStack supports parallel testing, allowing you to run multiple test sessions concurrently to reduce testing time.

Changes to be made in the XML file for multi-device execution:

<suite thread-count="1" verbose="1" name="Demo Android TestSuite" annotations="JDK" parallel="tests">

   <parameter name="endpoint" value="https://Username:[email protected]/wd/hub"/>

   <parameter name="host" value="BrowserStack" />

   <!--    Structure for execution platform is  <platform>:<deviceName(or)UUID>:<version> comma-separated multiples  -->

   <parameter name="executionPlatforms" value="Android: Samsung Galaxy S22 Ultra:12.0, Device 2, Device 3, Device 4, Device 5"/>

   <parameter name="androidApp" value=""/>

   <parameter name="iosApp" value=""/>

   <parameter name="browserStackAndroidApp" value="bs://XXXXXXXXXXXXXXXXXXXXXXXXXXXXXX" />

   <parameter name="BrowserStackiOSApp" value="" />

   <parameter name="projectName" value="Regression execution" />

   <parameter name="build" value="1.0" />

   <parameter name="timezone" value="New_York" />

   <parameter name="geolocation" value="US" />

   <parameter name="browserstackUser" value="Username" />

   <parameter name="browserstackKey" value="Password" />

   <test thread-count="1" name="login" parallel="methods">

       <classes>

       <class name="tests.LoginTest"/>

       </classes>

   </test>

</suite>


Anjana Prakash

Senior Automation Test Engineer at Testvox.